Showing posts with label Tips and Tricks. Show all posts

Windows Live Messenger 'Remember me' Fix

0 comments
Windows Live Messenger 'Remember me' FixHave you been using Windows Live Messenger, and then one day when you open Windows Live Messenger there is no Windows Live ID in the email box even though you have ticked the “Remember me” box?

You’re not alone! There have been many other people with the same issue. The reason for this is all thanks to Yahoo’s Toolbar. What Yahoo’s Toolbar does after installation is it changes the Registry value in Windows Live Messenger. Uninstalling the toolbar will still not solve the problem. However there is a solution.

There is an application by Jonathan Kay that is available for download here that can do the trick. But this is only possible for the English version.

Windows Live Messenger 'Remember me' Fix
For those who do not wish to download the Application or who do not have the English version, here are a few easy steps to follow below.

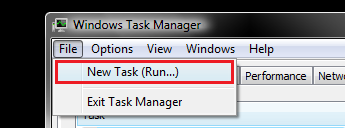
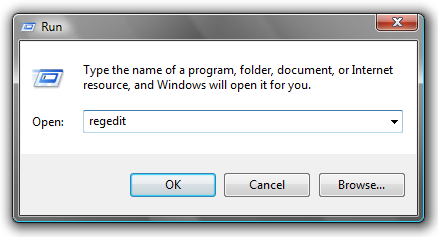
1. Click Start, and then click on Run

2. Type in regedit

Windows Live Messenger 'Remember me' Fix
3. Expand the following folders and go to:
HKEY_USERS \ S-1-5-21-796845957-926492609-725345543-1003 \ Software \ Microsoft \ Windows \ CurrentVersion \ Explorer

4. Click once on User Shell Folders

Windows Live Messenger 'Remember me' Fix
5. On the right hand side double click on the file called AppData

6. A window should appear with the Value data saying %AppData%, change this to say %USERPROFILE%\Application Data

For those who are using a Language other than English you have to change that expression to whatever it is in your language, for example in Spanish it is Datos de programa.

Windows Live Messenger 'Remember me' Fix
7. Now sign in to Windows Live Messenger and tick Remember me, then restart your computer.

Your Windows Live Messenger problem is now fixed!

Dress up your Firefox Browser with the Personas Add-on

0 comments
Dress up your Firefox Browser with the Personas Add-onAre you sick and tired of your boring default Firefox skin? Need something a little eye-catching to look at? Then you can look no further. Firefox have made a nice little Add-on which allows you to change the look of the browser as easy as changing your shirt. With Personas, you can individualize your browser with hundreds of artist-created designs or create your own design.

Personas will make your browser a little more fun and personal, as the Web Browser should be treated as your Canvas for all you artists out there. Dress up your browser, your way with easy-to-change “skins” for your Firefox browser. If you want to know how to achieve this, follow the simple steps below.

Note: The steps below are outlined as they were at the time of making. We cannot guarantee that the images or steps used will be the same for you. Please use this only as a guide!

Firstly head over to this link: https://addons.mozilla.org/en-US/firefox/addon/10900

Then click the green ‘Add to Firefox’ button.

Dress up your Firefox Browser with the Personas Add-on
When a window pops up, click ‘Install now’.

Dress up your Firefox Browser with the Personas Add-on
Next, you must restart Firefox for the Add-on to take effect. After you have restarted Firefox, you will notice a small little fox on the bottom left hand side of your browser. Clicking on it will allow you to dress your Firefox browser just the way you want it!

Dress up your Firefox Browser with the Personas Add-on
If you are artistic enough, you can even create your own skin. Happy dressing!

Bing vs. Google: A side-by-side comparison

0 comments
Bing vs. Google: A side-by-side comparisonEver since Google started to gain huge market share with their popular search engine, other companies have been feeling the sweat run down their forehead. Microsoft decided to take a stand and go head-to-head by launching their own search engine called Bing as you all should know by now.

But many of us might not have even bothered to try Bing out and see how well it does. Well now you can look no further if you want a totally cool way to compare them. Introducing the Bing vs. Google side-by-side comparison, literally!

Bing vs. Google is a program designed to give you dual-paned views of search results from both search engines. This way, you can actually get a feel of the strengths and weaknesses both of the search engines might have. The great thing about Bing is when performing a search; it will give you categories and suggestions related to your search term on the left hand side of your screen. Most of the time Bing will give you a number of very helpful links on the left hand side that are far more helpful than Google’s links.

One other advantage of Bing over Google is Bing’s natural language searches, for answering questions. Bing also lets you hover your mouse arrow over video thumbnails and preview the videos playing before you actually go through all the trouble of visiting the page where they are located. This is probably one of the best features Bing has which Google lacks.

Overall Bing provides really robust search results with outstanding modern functionality that in some cases are superior to Google’s features. For now it is still unknown whether Bing will rise over Google’s search engine, but one thing is for sure, Google is in for some serious competition and Microsoft has some serious work to do if it wants to convince Google’s loyal searchers to jump on their ship.

Again, the link to the Bing vs. Google website is here: http://www.bing-vs-google.com/

Try comparing them side-by-side and see if it will convince you to switch from Google’s team to Microsoft’s if it hasn’t already!

How to minimize Firefox to the system tray

0 comments
If you are a crazy multi-tasker who has like 10 minimized windows that can’t even fit in the Windows Task Bar, or if you don’t want anyone to see you have the Firefox browser open, then you need the MinimizeToTray Firefox Add-on.

This allows you to minimize any Mozilla window to the system tray just by clicking the minimize button, or with some minor configuration it can be minimized to the tray even when clicking the close button. It is a great way to free up some space when you have a lot of windows open.

Note: The steps below are outlined as they were at the time of making. We cannot guarantee that the images or steps used will be the same for you. Please use this only as a guide!

Firstly visit the link for the Add-on: https://addons.mozilla.org/en-US/firefox/addon/10488

Then click the ‘Add to Firefox’ button.


When a window pops up, click ‘Install now’.


Lastly, you must restart Firefox for the Add-on to take effect. Enjoy minimizing Firefox to the system tray!

Find out How Long Your Computer Was On

0 comments
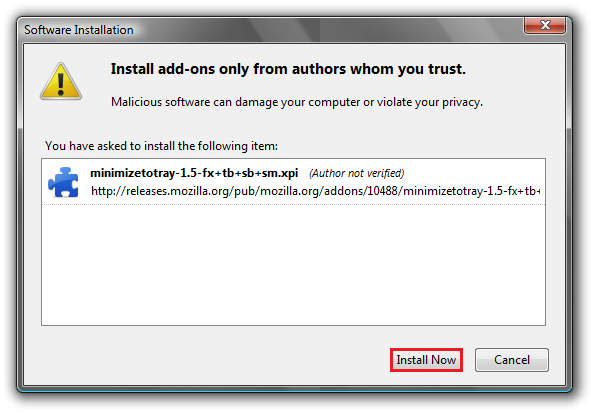
Ever wondered how long your computer was on for? Or has your mum told you to get off the computer because she thinks you have been on for the whole day and want to prove her wrong? The really simple guide below will show you how to do just that!

Below is outlined how it is done using the Windows Vista OS. If you have Windows XP refer to the steps after this.

Firstly open up Windows Task Manager by pressing CTRL+SHIFT+ESC. Then click the ‘Performance’ tab. Have a look where it says ‘System’. Then below that you will see it say ‘Up Time’ you will see the amount of time your computer has been on, in the order of Hours:Minutes:Seconds.

For the Windows XP users, it is just a tad more complicated.
Hit the Start menu, then click on ‘Run’ and then type in ‘cmd’ which will open up Command Prompt.


Then simply type in ‘systeminfo’ without quotation marks as always. It will show the amount of time your computer has been on under ‘System Up Time’.


Last but not least for all you Mac Lovers out there that still don’t know how to go about doing this, navigate to Applications>Utilities>Terminal then type in ‘uptime’ and hit the enter key.

Now when your parents tell you to get off your computer because you have been on for the whole day, you can retaliate by showing them pure proof of how long you really have been on for!

Fix Windows black screen after login

0 comments
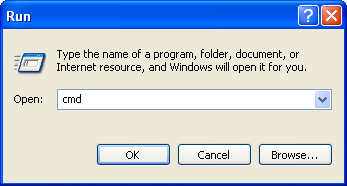
Have you ever started up your computer, logged in, and then find yourself staring at a black screen with just your mouse cursor showing? For the people that have, this guide should help you out.

Firstly open up the Task Manager by pressing CTRL+SHIFT+ESC. If for some reason it doesn’t appear, then you are out of luck.

After you are in the Task Manager navigate to File>New Task(Run…)


When a new window will appear, type ‘explorer’ without the quotation marks. This will open up the process called explorer.exe which is the process that normally runs as soon as you login. It is the process that makes your desktop, desktop icons and the windows taskbar to appear.


The next step is to edit some Registry Files. We are not held responsible for any loss or damage that this might cause to your computer. Edit these files at your own risk.

Click the Start Menu and then choose ‘Run’. Or for the few using Vista, hit the Start Orb and in the search box type ‘Run’ and click on the application when it appears. When the Run window appears type in ‘regedit’. You must have Administrator Privileges in order to run the Registry Editor.


Then navigate through all these folders: HKEY_LOCAL_MACHINE\SOFTWARE\Microsoft\Windows NT\CurrentVersion\Winlogon. After you have clicked on the Winlogon folder, find the string called ‘Shell’ and double click on it.


It should only appear with ‘explorer.exe’. Delete the other values that it has and type in explorer.exe as the image below shows. Then hit the OK button!


NOTE: If you had any other values inserted instead of explorer.exe, it is recommended that you scan your computer with a Virus scanner, as it may be infected with Malware.

Now simply restart or logoff your computer and see if the black screen problem has been fixed. Enjoy!

What is Defragmentation and does it make my computer run any faster?

2 comments
Imagine you have a filing cabinet with all your documents and papers in it, but it is a total mess. You have papers thrown everywhere and folders that are almost about to explode full of junk. If you would try to find something that you are looking for, do you think you would have trouble finding it? Of course! Not to mention the amount of time it would take too.

But if you would have your filing cabinet neat and tidy, arranged all in a nice row, you could find what you are looking for almost instantly! This is in a way, how it works with your everyday computer.

As you use your computer, your files will begin to become fragmented. In general this will cause your computer to become laggy and very slow to respond. Defragmenting will generally improve the system performance.

Some applications may rely on multiple files in order to run, but if those files are scattered to either ends of the hard drive, your computer will have more work to do and take more time to do the task required. Your drive will be swifter if all the files are in one place, not scattered to separate ends of the drive.

Defragmenting organizes your files so that they are non-contiguous. By not defragmenting your hard drive regularly, your files are in fragments of data. Fragmentation makes your hard disk do a huge load of extra work that can slow down your computer. Disk Defragmenting rearranges fragmented data so your hard disk can work more efficiently and will leave your free hard disk space in one big portion. The new files that will be saved will be well organized and in a tidy manner.

Regular defragmenting may also help to increase the overall hard disks life-span. Not defragmenting regularly may put extra strain on the hard disk by having to do extra effort to find file fragments. This can also cause computer crashes, besides slowing down your system.

Some may report that defragmenting too often will stress out the drive and thus reduce its life-span. If defragmented regularly, the less time it will take and the less stress it will have on the drive. It is recommended to defragment your drive regularly, plus as soon as you get your hands on a new computer, as it will maintain your computers performance.

For those that do not know how to defragment on a Windows based computer, simply navigate to 'My Computer' or 'Computer' then right click and select 'Properties'. Up the top select the 'Tools' tab then under 'Defragmentation' select 'Defragment Now...’ Refer to the picture below for any further help.


NOTE: The first time you do this, it will take a while since it has got a massive load to defragment. Just be patient and happy Defragmenting!